Perception---you have that power.

There is purpose in design. There is information in a setting. There is truth in your environment. Fake or real, it's there.

All images are copyrighted by Heidi Hoffer unless otherwise indicated. Your courtesy in using my photographs must include crediting me as the photographer. You must tell me when and where you've used them and send the link to me showing your use of them.
Showing posts with label Wits Theatre. Show all posts

Friday, December 3, 2010

15 South African Scenic Artists Experience Rosco Supersats

Scene Painting Workshop Held at Wits Theatre

The task:
This images shows the step by step process of painting stage draperies.


The results:
Everyone's painting was fantastic.
It was important for everyone in the workshop to experience paints from the international leader in scenic paint for the entertainment industry. They deserved to experience the best. I worked with Oliver Hauser from Congo Blue of Johannesburg, Ron Knell of Rosco UK, Jenny Knott of Rosco USA and the Nic Mayer from the Wits Theatre and Jenni-Lee Crewe from the Wits Drama Department to produce a professional Scene Painting workshop featuring Rosco Off Broadway and Rosco Supersaturated paints.


The Fulbright experience works both directions; 15 South African scenic artists got to experience the pleasure of Rosco brand paints. I got to share with them my knowledge of using these special paints. I use Rosco products in my work at Oklahoma State University as well as in my professional work.

The first step is the shadows. Here I have shown the use of Payne's Grey and Van Dyke Brown as effective shadow colours.
Barati experiences the success of darker shadows.
Rosco Supersats are meant to be greatly diluted. This was the main learning curve for everyone involved. (That, and learning to paint with your brush tied to the end of an extension stick!)

Courtney is ready to apply colour.
 Rosco paints are water-based acrylic paints. The participants were amazed that the paints diluted so nicely (great color even at 10 water to 1 paint). They were pleased that this represents a significant savings, too.

Adriano kneels to get a bit of fine detail accomplished.
The participants first laid in water creating the shape of their shadow area. They made sure the water’s edge was sharp where the shadow needed to be sharp, and abundant where the shadow needed to be soft. Then they brushed in washes of shadow using Payne’s Grey Rosco Off Broadway paint.


Abie begins to add the blue colour
We ate lunch whie the shadow layer dried, and when we returned, we layered on the diluted blue or red and proceded with the paper pounce of the rope and tassels next. The bottom fringe was an exercise in dots for highlights.

Wilhelm adds detail to the bottom fringe.

From front to back, Jenni-Lee, Wilhelm and Klara deepen their red drapery.

Roger pauses to let his red drapery dry.

Oliver of Congo Blue provided Roger's Door prize win - a case of Rosco Vivid FX Ultraviolet reactive paint.
  

Friday, November 26, 2010

The Cairo Job

Taking the Fulbright to Egypt for 10 days

Chekov’s Three Sisters: Recreating Russian Birch Trees in the Desert


As a Fulbrighter, I realized that persons from Oklahoma State University, The University of the Witwatersrand, and the American University in Cairo were joining together in producing this piece of theatre.
 
The Three Sisters Play poster shows how important birch trees are to the environment of the play


I was able to extend the reach of my Fulbright experience into Egypt when I invited Nic Mayer, the Technical Director from Wits Theatre to participate in the production process of the American University in Cairo’s production of Chekov’s Three Sisters designed by Bill Forrester. This would allow a South African theatre professional to experience a somewhat American theatre organization in a totally different country. AUC, while it has an American TD and several other Americans on their faculty, is distinctly non-American in the scene shop and costume shop and lighting area. The product is still the same, though, same as it is here at Wits: a show. Nic will take the knowledge and experience he has gained back to his students at Wits and disseminate it for years to come.

Dave Wlodarski, AUC’s Technical Director, forwarded me by email all of Bill’s paint elevations and Photoshop models of each act, including some of the early versions so I could understand the design team’s concept. Several days before our departure we began making tests with materials and experimenting with painting techniques for the birch trees and the wooden floors. The wallpapered walls, with spatter and ageing would happen once we landed in Cairo.

I photographed the results of our tests and sent them the design team by email. I also Skyped the American designer Bill Forrester and the AUC Technical Director Dave Wlodarski in order to discuss the techniques and establish a timeline consensus. My position was that of Charge Artist for the production.


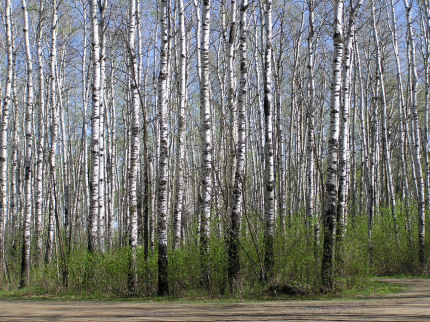
Bill Forrester sent several images of birch tree forests so we could see how skinny and pole-like the trees were. We noticed, too, the bushy undergrowth which would also need to be reproduced.
 

This is a Photoshopped model Bill Forrester did of his ideas for Act 4 of the Three Sisters.


The environment for Three Sisters is usually surrounded by a birch tree forest. The designer sent several images of a birch tree forest such as the one above. We needed to examine what actually made the dark marks on the white bark, and how the peeling bark cast shadows. The set designer and lighting designer (Stancil Campbell) both wanted trees with texture so lighting could change to quality of light in the forest. I found several more images which helped explain how the bark works.


Peelng bark and dark "spatter and drag" on a real tree. Both photos are from this website

Another example of bark curls on a real birch tree.

This picture shows the stronger horizontal patterns created by failed branches. This image is from here. It is picture #52.
One of our experiments was to make samples of the trees before arriving in Cairo. Using a cut-out trunk shape of thin plywood or masonite, we settled on a wrinkled newspaper method after experimenting with several other materials including cheesecloth, burlap or hessian, and lightweight muslin or calico.


The newspaper sample was the clear winner. The burlap was too soft and fuzzy, the cheesecloth was too limpid and flat, and the calico didn’t create sharp enough bark peelings. Below is our second newspaper birch tree sample, which everyone liked.

This is the second sample we did of the newspaper birch trees. There is black tule in between the trunks which will act as a projection surface for autumn leaves.


These images above show the process of pinching a pleat into the newspaper to become one of the horizontal bark elements then another layer of paint is put on to keep the pleats stiff and to blot out the headlines on the newsprint.

When we arrived we had 56, 7 meter tall birch trees to make. The AUC students helped quite a bit. They learned the process including using paint as the glue for the wrinkled newspaper, applying highlight and shadow, and spatter and drag.

Here’s most of the birch trees laid out in the AUC parking lot, with a few trees in the middle having had their first spatter and drag pass and a few knotholes enhanced. Several AUC students helped texture and paint the trees.
  
For the wooden floors, I determined the viewing distance and the viewing angle to help me decide how bold the floor boards needed to be. During the experiments, we fine-tuned the paint to water ratios, and determined whether the spatter and drag step should be done with a warm or a cold color.

Here’s our samples, which the designer felt could go even darker.

This sample is done on a sheet of already many-times-painted Masonite. It includes several wood-grain styles. My favourite it the top left which shows the saw marks. And my next favourite is the heartwood on the bottom and second one up. We were thinking of pine floors, not having any particular direction in that area.


This curved wagon above is just a small portion of all of the wood-grained rolling units we did. The overall value is darker, and the wood color is slightly warmer. It has a blue spatter on top to aid in the cool-toned scenes.

This image shows one of the settings nearly completed. Although there is rehearsal furniture on it, you can see the darker tones in the wood floor. Notice, too, the ageing applied to the columns and cornice header. The striped wallpaper and stencil work on the upstage wall is all paint.


Below is one of Bill Forrester's paint elevations for the upstage wall. Basically, once we got to Cairo, Bill said make everything darker than the elevations. Pitiful pale prints were what I had to work with until I could get my hands on the originals, and subsequent research information encouraged Bill to take everything darker and richer.
Bill Forrester's paint elevation for the Three Sisters Act 1 upstage wall.
   

Above is the stencil pattern used on the upstage wall. We painted the green stripe first, then laid the stencil down and painted back the wall color. The entire wall was spattered in 3 colors, so the lighting designer could warm or cool the scene at will. One student in particular helped do the stencil on these walls.  The reverse side of the upstage wall gets a dark aged wood clapboarding – all in paint. 


This exterior dark wood above is missing its secondary highlight for the curved part of this unusual wooden siding. It almost looks like chinked logs in the research. Bill decided it was a shiplap of some sort. It is also missing its spatter and drag, and its silver blue color wash to tone down the highlights and grey-out whatever warm there is in the base.


This detail of the exterior siding has its final paint: spatter and drag, secondary highlight, and blue wash.


One of the pictures from the English Russian Wooden House website we used for reference.


This is a close-up of the cornice and pillars. AUC carpenters are famous for their attention to detail.

 
Above is a section of the wallpaper, largely done by Bill Forrester himself, for the bedrooms. We first painted the background stripes, the striped those with a contrasting softer stripe, then Bill applied the stencils ( a labor of love) and then we streaked a bit of watery Van Dyke Brown age on top. This photo is just before streaking the VDB.


This photo shows the wainscot getting scumbled in and aged.


This image below shows the scene shop complete with dust collectors for each power tool. Very nice.


AUC's Scene Shop. Kamal, Abd'el Nabi and other wonderful technicians work there!

And since there’s no final view of the finished set yet, this image below  should let you know what the stage space is like; the seating is steeply raked, and the apron has a dedicated lighting pipe over it! How lucky.


The Malak Gabr Arts Theatre at the American University in Cairo with some of the Three Sisters scenery on it.


Sunday, October 31, 2010

More Lighting Instruments Found at Wits

An old floodlight found at the Wits Theatre
Every theatre needs to have an instrument that looks so old it is older than Yoda, right? Here's a floodlight that fits the description.
And here is the view from the front:
Looking at the front end of the floodlight showing the pebbled aluminum reflector.
And, to contrast that old instrument with modernity, here are two favourites: the Source Four Zoom and the Martin 300.
The Source Four Zoom continues the trend of South African lighting designers prefering zoom instruments over fixed angle instruments.  

The Martin 300
  And at the cyc are these quad cyclights:
A Quad Cyclight.
And the sidelighting work horse of this theatre is the Par Can, pictured below.
Par Can
Promoting the snazzy city feeling in the lobbies, the directional signs are done in neon lights.
Directional signs in the Wits Theatre complex are done in neon lighting. It makes the theatre look trendy!

Saturday, October 23, 2010

Stage Lighting Instruments Used in The Wits Theatres

          Most of the theatre lighting technology at Wits is from Europe, with a small number of ETC Source Four Zooms from the United States. The lighting consoles include a Strand series 200 (manual, 24 Channel, 2-Preset) and a Strand series 300 (programmable). The software for these has been discontinued, so as they fail they must be replaced.
Julian, the head of lighting here has been trying out an ETC ION and a Grand MA. ETC unfortunately as yet does not have the support back-up necessary to really land a sale, yet, but I know the groundwork is being made with certain vendors here. The Grand MA Ultra, seems to be the current choice of replacement console for the main theatre. Most everyone here relies upon Strand equipment.

          (The theatre on the education campus has a Strand MX with 48 channels. This theatre, called the “Space Frame” is certainly an interesting reconfigurable theatre which I will address in another blogpost.)

Theatre Lighting at Wits…

To begin, while the stage pin connector is a standard 2P&G, it is rated for 16 amps at 250 volts, and looks triangular.

There is a great safety item in all modern household circuits here as well as on all of the circuits you’d plug stage instruments into: each circuit has its own switch!
Circuit # 102 has its own 2 pin and ground outlet, complete with rocker switch to turn the circuit on or off. It also has a masking tape label for what gets circuited when the plot is restored to the standard plot.
In the above picture you can see the end of one of the stage electrics, with its top batten, electrical raceway, and bottom hanging batten. If the instrument doesn’t work after you’ve hung and circuited it for show, part of the trouble-shooting includes seeing if the damned switch was turned on!! ALL circuits have this safety item whether they are standard wall outlets or stage circuits.
This is a Harmony Profile 22/40 Zoom 
One of the well-used instruments here is the Harmony 22/40 degree beam angle zoom and it’s narrower brother, the Harmony 15/22 degree beam angle zoom. These were manufactured by Strand in 1981, and have been  steadfast performers. They are an ellipsoidal spotlight, shutterable, accept gobos, and work very well at hard focus or soft focus. Here is a link to the historic Rank Strand instrument archive featuring these babies: http://www.strandarchive.co.uk/lanterns/documents/harmony2240data1.jpg

This is a Harmony PC instrument.
The Harmony PC is the most interesting instrument because it is not shutterable and it’s beam quality lies somewhere between that of an ellipsoidal and a Fresnel. It has a single adjustment (knob is featured in the picture below) for a diffused beam variable from a very tight spot, similar to a beamlight, to a wide angle flood. The beam edge quality, which is free from colouration, is similar to a soft-focused ellipsoidal spot, but much tighter than that of a Fresnel.

The underside of a Harmony PC.
In the above picture showing the bottom of the Harmony PC you can see the round black knob that you loosen to slide the lamp/reflector sled assembly forwards or backwards in the slot. This particular instrument has the lamp/reflector close to the lens for a wide beam. (Instrument is pointing downwards to the stage floor)  Here is the link to the historic document from the Strand Archives about the Harmony PC: http://www.strandarchive.co.uk/lanterns/documents/harmonypcdata1.jpg

Checking the circuit to a Quattro Pro.
In this photo above, the student lighting technician is turning on the circuit to a Strand Quattro PM Fixed Angle profile (650w)... and apparently held together by black gaffer tape, as identified by Julian. Behind her head is one of the Harmony Fresnels. Here's the link to the Harmony Fresnel: http://www.strandarchive.co.uk/lanterns/documents/harmonyfdata1.jpg


The beautiful tin ceiling of this theatre has been painted black, of course. This picture was taken in The Nunnery Theatre at Wits during the lighting design class final exam.

More lighting instrument stories are planned...including dimmable fluorescents and Fresnels that look like metal eggs!